


The following is the established format for referencing this article:
Strassmann, J. E., B. Mayer de Souza, A. Van Zoeren, and W. C. Scharf. 2022. A pattern and procedure for sewing bird bags for bird banders and ringers. Journal of Field Ornithology 93(3):2.ABSTRACT
Bird banding (or ringing) is an essential part of many aspects of ornithology. From the time a bird is extracted from a mist net or other capture method to the time it is banded, measured, possibly tagged, and released, it is typically held individually in a secure cloth bag. Although it is important that these bags must have no rough seams, efficient sewing instructions are hard to find, and purchasing bags can be costly. Because it is essential to wash the bags used to hold birds for banding between every use to prevent disease transmission, an active banding station needs many bags. Here, we provide an easy pattern for a bag that leaves no exposed seams. There are four sewing steps, one ironing step, and one step to thread the shoelace drawstring through the top casing. It is most efficient to work on multiple bags at once, doing all of one step before moving on to another, and each bag will end up taking ≤ 20 min from start to finish.RESUMEN
INTRODUCTION
Handling birds so they can be banded, measured, and otherwise monitored is essential to understanding avian numbers, movements, condition, and much more (Gill 2007). Once a bird is taken from the mist net, it is generally held for a few minutes in a cloth bag before it is banded or tagged, measured, and released. Opaque cloth bags stress birds the least, if the experience with Eastern Bluebirds (Sialia sialis) is any indication (Carleton and Caldwell 2019).
The banders’ study guide from the North American Banding Council (2001, section 8.6.1) recommends drawstring bags of cotton large enough so that one can reach in and extract the bird using the bander’s grip. The guide specifies having no rough seams that might tangle a bird’s toes or tongue (North American Banding Council 2001). Here, we provide an easy pattern for sewing a bird bag that leaves no exposed seams.
METHODS
An excellent and economical way to obtain appropriate bags is simply to sew them. We did not find satisfactory instructions readily available and so developed our own. These instructions make a bag that measures approximately 22 cm square, although they can be adjusted easily to any size. The bag has a drawstring made of a shoelace or similar flat band. All seams are double-sewn, so the bird is not exposed to any raw edges. The most efficient way to make these bags is to do all of one step on a number of bags before moving to the next step.
Use lightweight 100% cotton cloth, ideally in a light color. Poplin cloth works well, but the cloth does not have to be new. Used cotton bedsheets or pillow cases are also fine. Wash the cloth before using. Iron it if it is very wrinkled. The bags will be washed between each use, so should not wrinkle excessively. No one has time to iron bird bags.
- Cut rectangles 28 × 50 cm (Fig. 1.1). This step is most easily done by cutting out a model from a piece of cardboard, laying it on the cloth, and marking the pattern using a pen. We cut all the pieces we needed before proceeding, after making one bag fully to be sure all was well. Of course, bags can be made of other sizes as desired.
- Fold over and crease approximately 5 mm on both ends, along the short dimension, approximately 8 cm in length (Fig. 1.2a and b). Sew this little piece down approximately 8 cm along the short edge.
- Make a casing or tube for the drawstring (Fig. 1.3a and b). This step will require ironing and pinning. First fold down and iron approximately 5 mm along the long dimension where the two sewn edges are. Then, fold this piece over to make a casing approximately 2.5 cm deep. Iron this casing. Pin the folded casing in place with about four pins.
- Sew down this casing being sure to backstitch at the beginning and at the end to keep the casing strong at each end (Fig. 1.4). Some people place the lace for closing the bag in the casing at this point and sew, being careful not to catch the lace in the edge stitching. We think it is faster to simply sew the casing and push the lace through the casing at the end, as noted in step 7.
- Fold the cloth in half, with the raw side of the casing showing, to form the dimensions of the final bag (Fig. 1.5a and b). Sew along the open edges (bottom and one side), taking care to stop shy of the casing at the top. If needed, trim any excess fabric along the stitching to be sure the next step will encompass the raw edges. Remember to backstitch beginning and end to improve durability.
- Turn the bag inside out and sew over the same two sides to keep the raw edges away from the interior (Fig. 1.6). Trim any loose threads.
- Feed the flat drawstring (approximately 70 cm long; I used 70-cm shoelaces easily bought in bulk online) through the casing (Fig. 1.7). This procedure is best done with a sewing implement called a bodkin, but can also be done by attaching a large safety pin to one end or by taping one end of the shoelace to forceps or narrow tweezers and pushing it through the casing. Once it is out, tie the ends in an overhand knot and you are done!
DISCUSSION
These instructions make a bag with interior dimensions of approximately 23 × 21 cm, which is suitable for most small to medium passerines and smaller woodpeckers. The instructions are identical for larger or smaller bags: just change the size of the initial cloth rectangle.
In the field, we bring sufficient numbers of bags with us when checking nets. We wear a necklace of carabiners, with each one labeled for a given net. We have 10 nets, so have 10 carabiners to take the bags as they are filled with birds. This way, back at the banding table, we know which bird came from which net.
Following these instructions, we made 70 bird bags in a few evenings, enough for all our bird banding needs.
CONCLUSION
With these instructions, it is easy and inexpensive to make as many bird bags as you need and to use a freshly laundered one for each bird.
RESPONSES TO THIS ARTICLE
Responses to this article are invited. If accepted for publication, your response will be hyperlinked to the article. To submit a response, follow this link. To read responses already accepted, follow this link.ACKNOWLEDGMENTS
We thank Cherryll Frick for the loan of her sewing machine. We thank David Queller and Mark Hauber for helpful comments on the manuscript.
DATA AVAILABILITY
There are no underlying data or codes.
LITERATURE CITED
Carleton, R. E., and R. M. Caldwell. 2019. It’s in the bag: corticosterone levels and behavioral responses of Eastern Bluebirds (Sialia sialis) vary with type of holding bag. Wilson Journal of Ornithology 131(3):701-710. https://doi.org/10.1676/18-0017
Gill, F. B. 2007. Ornithology. Third edition. W. H. Freeman, New York, New York, USA.
North American Banding Council. 2001. The North American banders’ study guide. North American Banding Council, Point Reyes Station, California, USA. https://nabanding.net/passerines/manuals/

Fig. 1
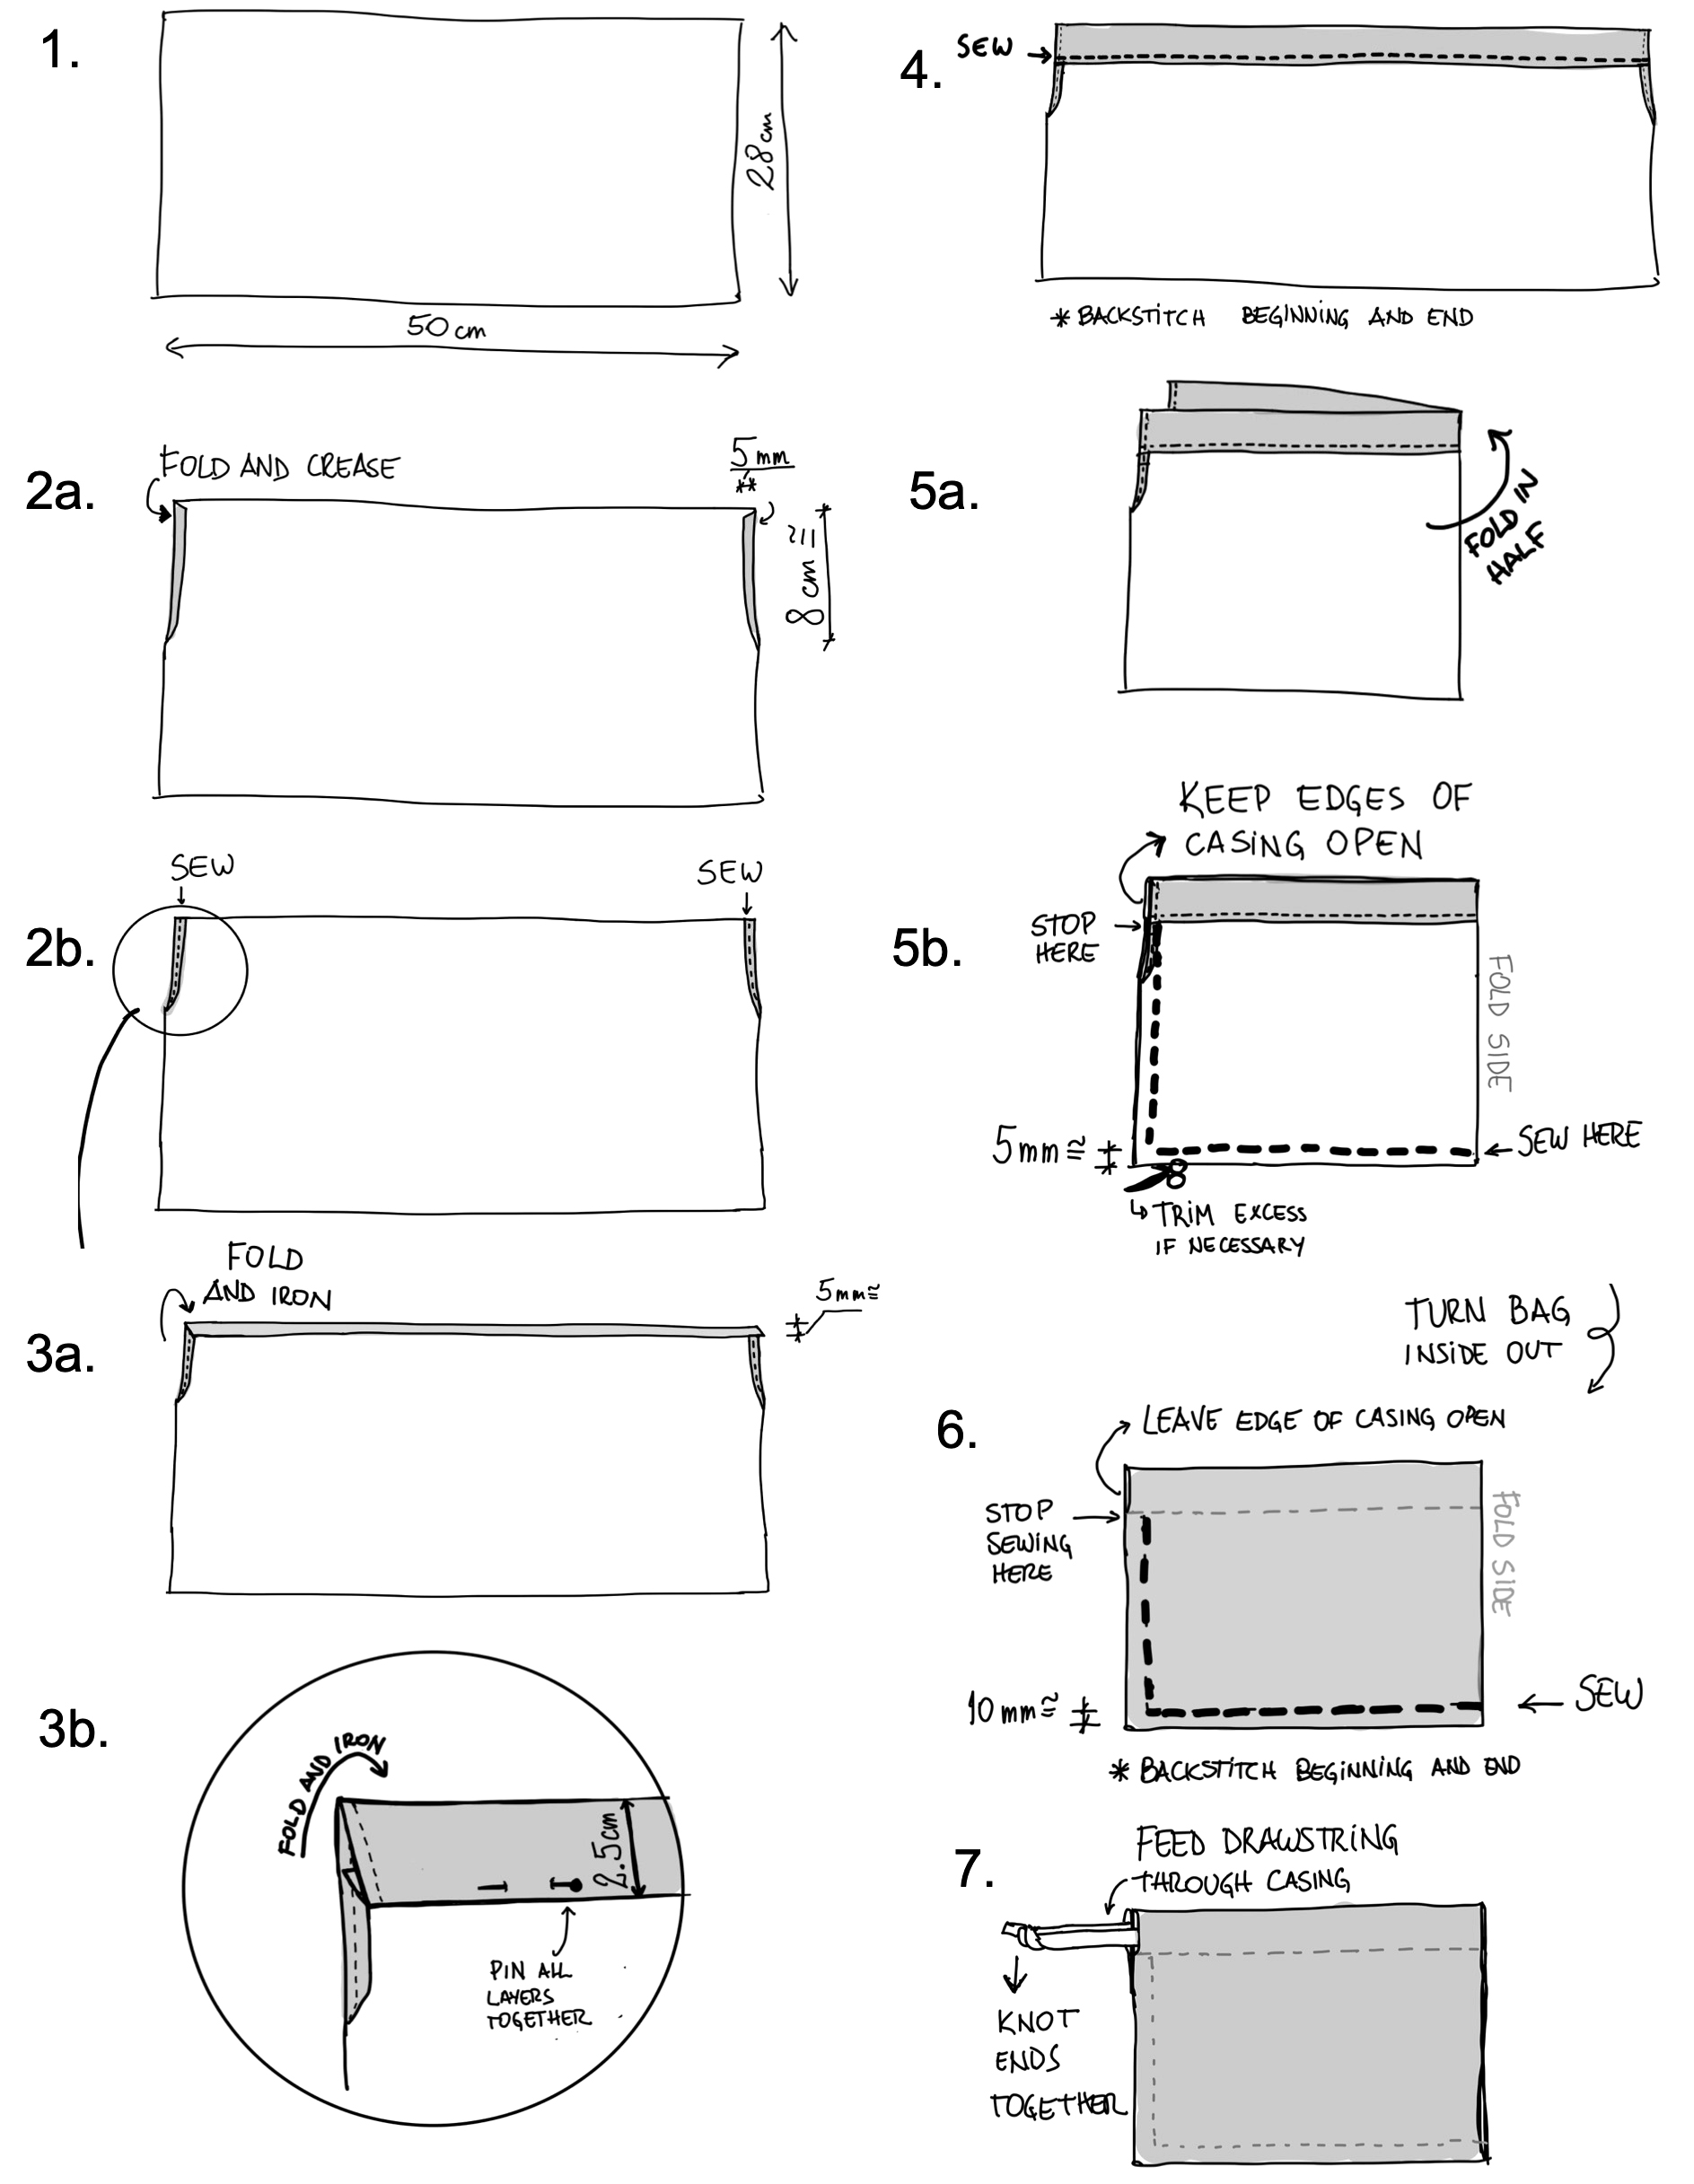
Fig. 1. Step-by-step illustrations showing the procedure to make a bird bag. See text for detailed instructions to match each step. Note that the shaded side is the eventual outside of the bag, and the white side is the eventual inside of the bag, though the bags can also be used inside out.